
검색 결과 캐싱
Pagination with @EnableSpringDataWebSupport
Application 에 다음 어노테이션을 추가한다.
@EnableSpringDataWebSupport(pageSerializationMode = VIA_DTO)
@EnableSpringDataWebSupport(pageSerializationMode = VIA_DTO)
@SpringBootApplication
public class RedisApplication {
    public static void main(String[] args) {
        SpringApplication.run(RedisApplication.class, args);
    }
}
스프링 부트 3.3.1 버전에서 위 어노테이션이 없으면 warning이 뜬다고 한다.
공식문서를 보면 다음과 같이 나와있다.
EnableSpringDataWebSupport (Spring Data Core 3.3.2 API)
Since: 1.6 Author: Oliver Gierke See Also: Copyright © 2011–2024 Pivotal Software, Inc.. All rights reserved.
docs.spring.io
💡 Causes PageImpl instances to be wrapped into PagedModel instances before rendering them as JSON to make sure the representation stays stable even if PageImpl is changed.
PageImpl 인스턴스를 PagedModel 인스턴스로 래핑하여 JSON으로 렌더링하기 전에 처리합니다.
이렇게 하면 PageImpl이 변경되더라도 표현이 안정적으로 유지됩니다.
- 페이지네이션 안정성 유지
PageImpl은 Spring Data 내부에서 사용되는 기본적인 페이지네이션 구현체로 이 클래스가 JSON으로 직렬화될 때PagedModel이라는 별도의 전송 객체(DTO)로 변환된다.PagedModel은 REST 표현과 관련된 메타데이터를 추가로 포함할 수 있기 때문에, REST API를 설계할 때 더 유연하고 확장 가능한 구조를 제공한다.
- PageImpl의 변경으로 인한 영향 방지
PageImpl은 Spring Data의 내부 구현체이므로, Spring Data의 버전이 업그레이드되거나 구현이 변경될 경우 API의 응답 형식이 영향을 받을 수 있다.VIA_DTO모드를 사용하면,PageImpl을PagedModel로 변환하여 응답 형식을 안정적으로 유지할 수 있다.
- 호환성과 확장성
PagedModel은 HAL(Hypertext Application Language) 등의 하이퍼미디어 형식과 잘 어울리며, REST API 응답에 하이퍼링크와 같은 추가적인 메타데이터를 포함할 수 있는 확장성을 제공한다. 이를 통해 API 클라이언트와의 호환성이 향상된다.
PageImpl은 기본적인 페이지네이션 데이터를 담고 있지만, REST API에서의 데이터 표현에는 한계가 있을 수 있다.
PagedModel은 더 풍부한 표현을 제공하며, 이를 통해 API 응답의 일관성과 안정성을 보장한다.
pageSerializationMode = VIA_DTO 설정을 통해 PageImpl을 PagedModel로 변환하여 직렬화할 수 있으며, 이는 API 설계의 안정성과 향후 유지보수성을 크게 향상시킨다.
따라서, 이 어노테이션과 옵션을 사용하는 것은 PageImpl 객체가 PagedModel로 변환되어 안정적인 JSON 응답 형식을 유지하여, 클라이언트와의 통신에서 확장성과 호환성을 제공하기 위한 것이다.
변경에 영향을 받지 않으려면 사용해야 하는 듯하다.
실제로 사용하지 않았을 때와 사용했을 때의 차이를 보자.
@EnableSpringDataWebSupport(pageSerializationMode = VIA_DTO) 사용하지 않았을 때 반환 값
{
    "totalPages": 20,
    "totalElements": 99,
    "size": 5,
    "content": [
        {
            "id": 26,
            "name": "monitor",
            "description": "et malesuada fames",
            "price": 60813
        },
        {
            "id": 30,
            "name": "monitor",
            "description": "In at pede.",
            "price": 33048
        },
        {
            "id": 34,
            "name": "monitor",
            "description": "malesuada id, erat. Etiam",
            "price": 55592
        },
        {
            "id": 38,
            "name": "monitor",
            "description": "neque. Nullam ut",
            "price": 61081
        },
        {
            "id": 42,
            "name": "monitor",
            "description": "ullamcorper",
            "price": 11034
        }
    ],
    "sort": {
        "empty": true,
        "sorted": false,
        "unsorted": true
    },
    "first": false,
    "last": false,
    "number": 1,
    "numberOfElements": 5,
    "pageable": {
        "pageNumber": 1,
        "pageSize": 5,
        "sort": {
            "empty": true,
            "sorted": false,
            "unsorted": true
        },
        "offset": 5,
        "paged": true,
        "unpaged": false
    },
    "empty": false
}
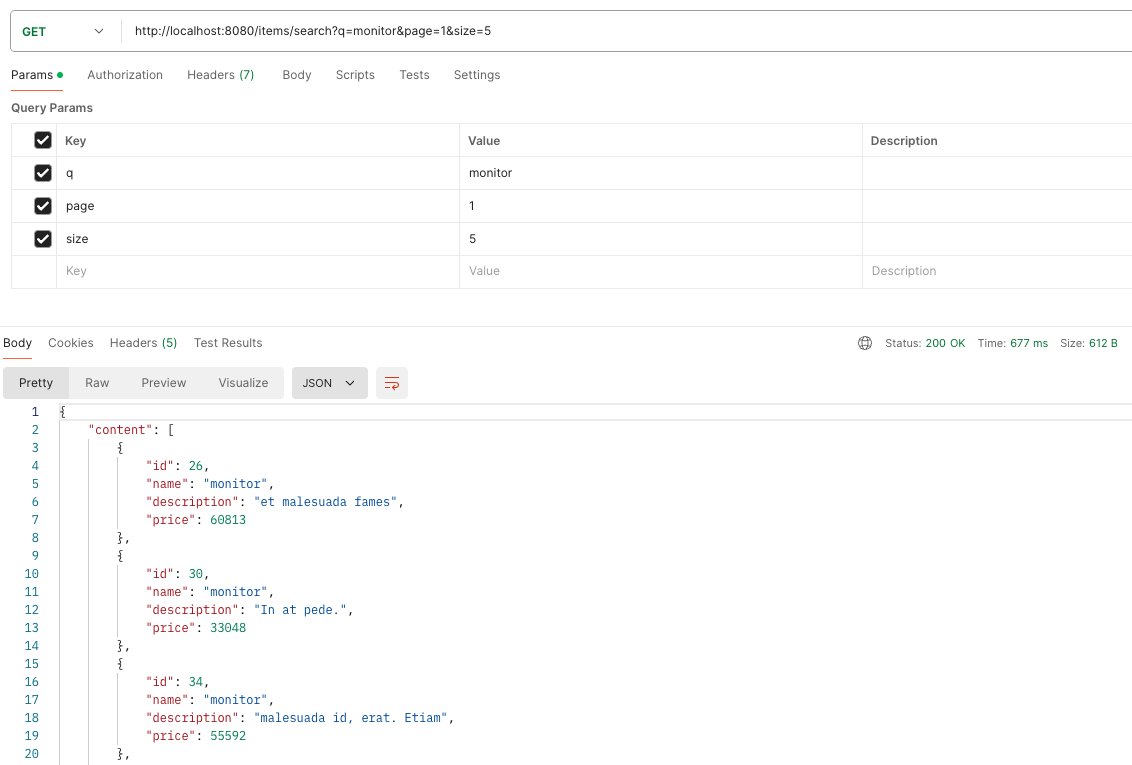
@EnableSpringDataWebSupport(pageSerializationMode = VIA_DTO) 사용했을 때 반환 값
{
    "content": [
        {
            "id": 26,
            "name": "monitor",
            "description": "et malesuada fames",
            "price": 60813
        },
        {
            "id": 30,
            "name": "monitor",
            "description": "In at pede.",
            "price": 33048
        },
        {
            "id": 34,
            "name": "monitor",
            "description": "malesuada id, erat. Etiam",
            "price": 55592
        },
        {
            "id": 38,
            "name": "monitor",
            "description": "neque. Nullam ut",
            "price": 61081
        },
        {
            "id": 42,
            "name": "monitor",
            "description": "ullamcorper",
            "price": 11034
        }
    ],
    "page": {
        "size": 5,
        "number": 1,
        "totalElements": 99,
        "totalPages": 20
    }
}
이것보게?
해당 어노테이션을 사용했을 때가 훨씬 간결하고 필요한 정보만 담고 있다. 앞으로 자주 사용할 것 같다.
검색 기능 만들기
- Controller Code
@GetMapping("/search")
public Page<ItemDto> search(
        @RequestParam(name = "q") String query,
        Pageable pageable
) {
    return itemService.searchByName(query, pageable);
}
✨ 이런식으로 컨트롤러 단에서 Pageable 객체를 넣어주게 된다면, 클라이언트에서 page와 size를 쿼리 파라미터로 넘겨줬을 때 자동으로 Pageable 객체와 mapping 된다. 그리고 page = 0부터 1페이지 다.
- Service Code
@Cacheable(
        cacheNames = "itemSearchCache",
        key = "{ args[0], args[1].pageNumber, args[1].pageSize }"
)
public Page<ItemDto> searchByName(String query, Pageable pageable) {
    return itemRepository.findAllByNameContains(query, pageable)
            .map(ItemDto::fromEntity);
}
pageable이 들고 있는 정보 중 몇 페이지인지를 나타내는 pageNumber
페이지 당 크기를 나타내는 pageSize를 사용
- Repositoy Code
public interface ItemRepository extends JpaRepository<Item, Long> {
    Page<Item> findAllByNameContains(String name, Pageable pageable);
}
- CacheConfig
https://singularity7606.tistory.com/28
캐싱 전략을 활용한 Redis와 Spring boot
캐싱과 캐싱의 필요성💡 캐싱(Caching) 자주 사용되는 데이터를 더 빠른 캐시(Cache)에 저장하는 기법을 일컫는 용어Cache? Cache는 CPU 내부의 작은 하드웨어로, 지역성(Locality)의 원칙에 따라 자주 접
singularity7606.tistory.com
위 글의 CacheConfig 참고
첫 번째로 요청을 보냈을 때: 677ms
두 번째로 요청을 보냈을 때 (캐싱이 돼서 레디스에 담겨 있음): 54ms

레디스에 잘 담겼다.

'데이터베이스 > Redis' 카테고리의 다른 글
| 캐싱 전략을 활용한 Redis와 Spring boot (0) | 2024.08.15 |
|---|---|
| Spring Boot와 Redis로 Session Clustering 간단 구현 (0) | 2024.08.14 |
| Redis 기초 및 Spring Boot 연동 (0) | 2024.08.06 |